Thursday, July 1, 2010

It's a warm, buttery Summer

A couple weeks ago I wanted buttermilk biscuits. Why? I don't remember. Besides, since when do my food cravings have to be tied to rational thought? It's a well known fact that everything makes me hungry, including and especially the phrase "I wish I were hungry." Good thing I just ate lunch. Now where were we?

Ah yes, Buttermilk Biscuits. This recipe is courtesy Joy the Baker. I could say things about it, but I won't. Just make them. You will understand.

Buttermilk Biscuits
(slightly modified from Joy the Baker, posted March 26, 2009)
  • 3 cups all-purpose flour
  • 4 1/2 teaspoons baking powder
  • 3/4 teaspoon cream of tartar
  • 3/4 teaspoon salt
  • 3/4 cup butter, cold and cut into cubes
  • 1 egg, beaten
  • 3/4 cup buttermilk, cold
Preheat your oven to 425 degrees F. Whisk together the flour, baking powder, cream of tartar and salt. Add in all the butter, and using either a pastry blender, a fork or your fingers, cut the butter in to the dry ingredients until it looks sandy/grainy. Mix the egg and the buttermilk separately and pour them into the dry ingredients, mixing them at first and then using your hands to press it all together. Knead the dough a few times on a very well-floured cutting board (I recommend flouring the board each time you press the dough on itself again - it gets sticky), then press it out until it is about one inch high. At this point you can use a cookie cutter to cut the biscuits out, or you can cut them into roughly even pieces with a very large, sharp knife. Either way, press straight down and do not saw or twist in the process. It will make the sides of your biscuit all flaky and delish.

Arrange the biscuits on a cookie sheet and bake them for 12 - 15 minutes, until they are slightly golden and fluffy. Enjoy with jam, butter, or anything else you fancy (I've heard mustard and ham is good).

A Very Merry Un-Birthday to You!

Last week was my birthday! I spent a wonderful, lovely, quiet day baking my extravagant birthday cake. The best birthday present I could have asked for was flying back to California the day before. See, I never did get a work permit in Switzerland. After three months I had to leave, and now I'm on the hunt for a new job in a new city. Don't we all dream about what we would do if? It's as if someone has freed me from every responsibility or concern and said "Martha, go out there and make your life look exactly the way you want." I had a glorious moment contemplating my wildest dreams as potential realities, discovering that my wildest dreams really aren't very wild at all. Problem?

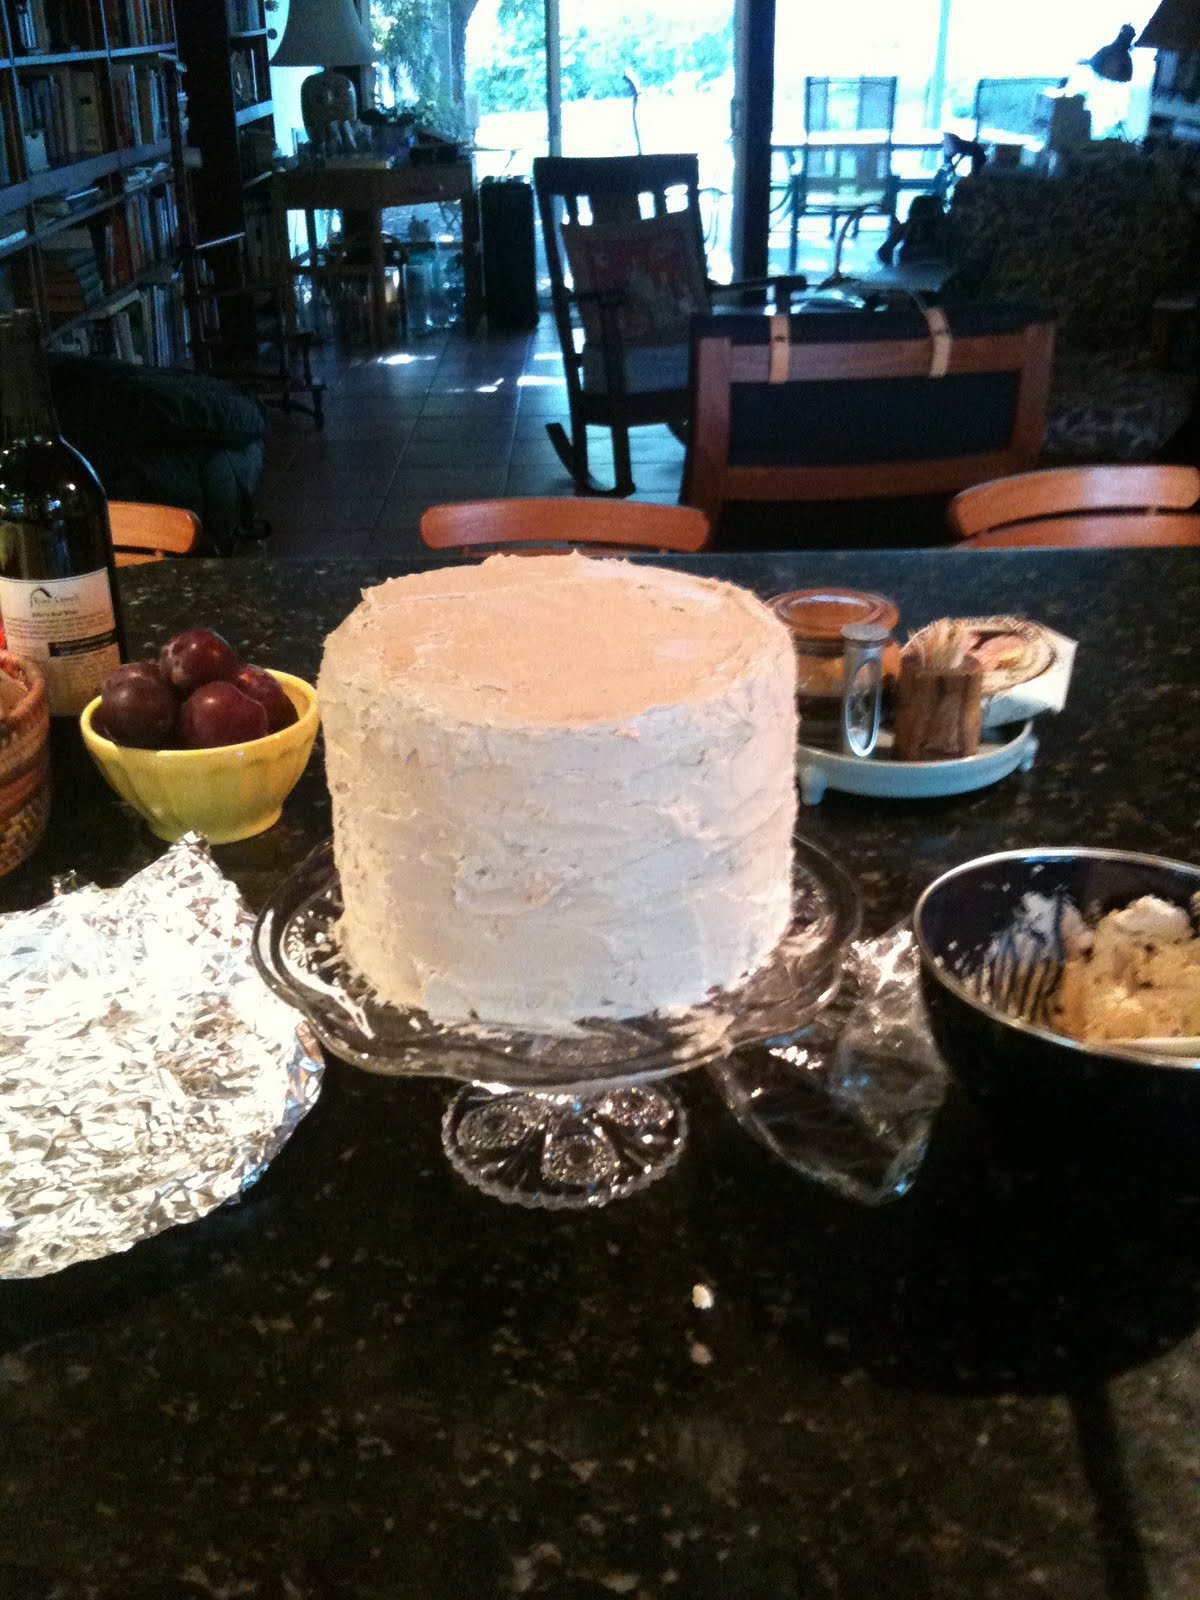
If you could have or be or do anything you want, what would it be? Last week this cake was all I could want out of life:

It's dreamily called Buttermilk Yellow cake with Brown Sugar Buttercream Frosting. Shall we rename it? How about Heavenly Cake, Scrumptious Cake, or Brown Sugar Dream Cake? Any ideas? The reason I chose this cake is because a) we had a bit of extra buttermilk in the fridge and buttermilk makes everything taste better and b) how good does brown sugar buttercream sound? I mean really now. I thought it would be a bit more tan, but as it turns out the egg whites really dominate this frosting. My only modification would be to add a little less salt to the frosting. On the other hand it gives it this intriguing salty-sweet caramel taste and prevents the whole cake from being too sweet.

As you can see the cake was almost purely white, which meant that after being assembled and frosted it looked like a wedding cake. To tell you the truth I hadn't thought past the baking stage so I really had nothing in mind for the decoration. Fortunately my sister and mom gave my dad a bunch of French lavender plants for the garden, which are beautifully in bloom right at this very moment. It only took a few minutes to pluck a few stems and arrange them artfully on the cake! (side note: it may still have looked like a fancy wedding cake. I do not care.)

Let's get into how I made it...and I want to remind you that it took all day. Still, you should try it sometime, there's nothing more satisfying than a perfectly iced three-layer cake.

Buttermilk Yellow Cake 
(originally Moist Yellow Cake published in Bon Appetit, August 2004)
  • 3 cups cake flour
  • 1 Tablespoon baking powder
  • 1/2 teaspoon salt
  • 1 cup (two sticks) unsalted butter, room temperature
  • 2 cups granulated sugar
  • 5 large eggs
  • 2 teaspoon vanilla extract
  • 1 1/4 cups buttermilk
Preheat the oven to 350 degrees. Butter and flour two (or three, if you'd like) 8-in (20 cm) cake pans.

I had to make my own cake flour this time because I ran out...Fortunately making cake flour is quite easy! You will need cornstarch and all-purpose flour. For every cup of flour take out two tablespoons. Replace the two tablespoons of flour you took out with two tablespoons of cornstarch. For three cups of cake flour, you would take out six tablespoons of flour and replace them with six tablespoons of cornstarch. Sift the mixture together about five or six times and you're ready to go.

After you've made your cake flour add in the baking powder and salt and sift it together again. Sifting will keep the flour very light and will allow the wet ingredients to permeate better. It will also lighten the crumb and prevent the cake from getting too heavy.

Spend a little time with the mixer on medium high creaming the butter. It should be fluffy and light-colored after a couple minutes. Now you want to add the sugar a quarter cup at a time continuing to beat the butter. This will allow the sugar crystals to break through the butter fat, keeping the cake light. One by one add the eggs, beating well after each one.

Mix the vanilla extract with the buttermilk. Now you're ready to mix it all together! Start with the flour, mixing in three parts, alternating with the buttermilk and ending with the flour. It's very important that you not over mix! Keep the mixer on medium speed and mix only until the ingredients are combined. After you've added everything scrape down the sides of the bowl and mix briefly.

Add the batter to the pans, filling each equally and smoothing the tops (this will help the cake avoid doming). Place in the center of the oven and cook until the top is golden and it starts to pull away from the side of the pan (about 35 minutes for me with three pans). A knife in the center should come out clean. Don't worry if they get a teensy bit overcooked, as it will actually make it easier to assemble and frost.

Now that the cake is in the oven, let's move on to the hard part!

Brown Sugar Buttercream
(originally seen in Gourmet, January 2001)
  • 3 large egg whites at room temperature
  • 3/4 teaspoon salt
  • 1 cup packed dark brown sugar
  • 1/2 cup water
  • 1/2 teaspoon fresh lemon juice
  • 3 sticks (1 1/2 cups) unsalted butter, cut into pieces and softened
  • 2 teaspoons vanilla extract
  • Special equipment: candy thermometer
This is apparently a bit of a tricky recipe...you have to make simple syrup and meringue, successfully combine them and add butter. Make sure all your ingredients are at the proper temperature, this will be the key to success with a buttercream.

First things first. Add the salt to your room temp egg whites. The salt will help make sure the whites fluff enough, but it will also make the frosting a wee bit salty, not in a gross way but noticeably. I would add only half a teaspoon next time, and see what happens. Once your egg whites and salt are combined (in a very clean, dry, room temperature stainless steel or copper bowl) set them aside.

Take out a small saucepan and mix the brown sugar and water in it. Put them over the stove on medium high and bring to a boil. Make sure it doesn't burn by stirring occasionally. While it's boiling, occasionally brush down the sides of the pan with a pastry brush soaked in water.  Right when the simple syrup starts to boil, start mixing your egg whites. Once they get to a frothy stage, add the lemon juice and continue beat until it forms soft peaks.

I didn't have a candy thermometer so I used a meat thermometer, but you want to let the sugar boil until it gets to about 240 degrees F. Just eye-balling it I would say this is the point where there are lots of bubbles coming up and it looks a little frothy. As soon as it reaches this point, pour it out into a heat-proof container.

Now you are going to slowly add the simple syrup to the egg whites while beating with a mixer. In a slow, thin stream add the syrup to one side of the bowl, beating at a high speed. Continue beating the egg whites for 6 minutes, scraping down the pan. It should be cool to the touch when you are done. It should also be shiny and look really pretty and fancy.

Now you need your butter. It's in pieces (about 1-inch should do the trick) and it's softened (but not melty). Adding one piece at a time, mix the butter into the meringue. Make sure each piece is thoroughly mixed in before adding another. This part is a little freaky, because your formerly pretty meringue is going to start looking a little icky and curdled. That's ok! It will come together again (I promise). If it starts to get too soupy (mine did) place the bowl in some ice water for a few minutes. By the time you've added all the butter the buttercream should have come together again and look like fluffy yummy frosting. Don't forget to add the vanilla at the very end. Nicely done!

Assembling the layers

You didn't forget the cake in the oven, did you? The cake should be out of the oven and cooling on a rack. When it's about room temperature take a bread knife and smooth out the top of it a bit, if it's domed. Don't worry about making it too perfect, the frosting should be able to help you out. After it's smoothed out and completely cooled, wrap each layer in saran wrap and tinfoil, and place it in the fridge for an hour or so. Trust me, it'll help you frost.

Make sure the frosting is room temperature and don't chill it, or it will make it more difficult to spread. Now let's assume the layers are cool and you're all ready to assemble the cake. Start off by putting the first layer down on the cake plate. A helpful tip I once read said to smear a little frosting underneath it so it doesn't scoot around too much. now you want to layer a thick amount of the buttercream on the top of the cake, ignoring the sides. Place layer two upside-down on layer one. If the frosting layer is thick enough, you can press the cake down where it's uneven to straighten it out. Repeat the same thing with layer three, placing it upside-down on layer two and generously frosting the top. Now you're gonna move on to frosting the sides of the cake. This is a little tricky but you can do it! Take a spatula with a flat edge and start spreading the frosting on pretty thick. The first round will look globby and kinda bad. That's ok! After you have plenty of frosting on the side of the cake, clean the spatula off and start smoothing it down. Try to use long strokes, going around the cake and not pressing down too much. Clean off the spatula frequently. When the sides look smooth you can smooth off the top. Here are a few photos (also proof that I did not buy this cake as some suggested!):


Monday, June 21, 2010

These times they are a changin'

Oh my readers, I have been neglecting you. I'm sorry! Between a two-week trip to California and other things which shall go unmentioned, I have not been spending much time on this blog. I still have to update you on the new buttermilk biscuit recipe I tried out (and subsequently used three times in a single week) and the ginormous chocolate bundt cake which would make you cry with happiness. Here's a picture:

 
More updates soon, but let's just say that the blog isn't the only thing that's changed recently.

Tuesday, May 25, 2010

Paris, and a small dissertation on dissatisfaction

I'm going to start with Paris, because maybe by the time I'm done I'll be (mercifully for you) too tired to expound on the second point. We live and hope.

PARIS! I went there, I saw things, I visited friends. It was chilly, it was snooty, it was delightful. You would think that going to the Louvre, the Eiffel Tower and the Pompidou would be on my list of tasks, but oddly enough (and I know you'll all be surprised to hear this) I really just wanted to eat my favorite foods! I didn't feel like wading through tourists most of the time, so my trip consisted of walks, and walks, and long long walks. I went to Versailles as well (combining wading through tourists and long walks, whew!). Here are some pictures:


A Medici fountain in the Luxembourg Gardens. It's always shadowy and melancholy, in spring time or winter, but especially in the fall when all the leaves are falling in it. Also, there are ducks.


So, everyone knows what this picture is, right? Oh, you don't? Pshaw, guess you have to be a Parisienne...nah, just kidding. This picture (which my friend Jon helpfully pointed out would not turn out right) was taken from a cafe at the base of a staircase going up to Sacre Coeur. They have a large terrace with whimsically colorful tables and chairs, and the trees are strung with light bulbs. Even when it's a little chilly outside, it's pretty magical at sundown. This picture does not capture the magic, but you forgive me, right?

This is a view of the Petit Trianon, a little palace that was built for Madame de Pompadour and later given to Marie-Antoinette. It's a nice little house, but it's not the reason I love this area. Marie-Antoinette had a little village built next to the palace so she could play shepherdess. Now a lot of people ridicule good old M-A for being "crazy" or "irresponsible" but I feel a little differently. As we were walking into the village an older French woman was describing Marie-Antoinette to her grand-daughter, "imagine she was far from home, only 16 years old, she didn't have any friends or family around, she didn't know what to do or how to run a country." I have some sympathy for a young, innocent girl in a foreign country far from her friends and family, speaking in a foreign language, expected to handle more responsibility than she ever had before with almost no training. I visit her garden feeling a little like she did: escape! It's comforting to be surrounded by trees and fields and no people. And, you know, to have a box of pastries too. Comforting.

Which brings us to this picture:


If you walk off the beaten path into the long grasses at the far corners of the estate, you can pretend that you're all alone in a field of wildflowers. (All alone except for the person taking your picture, obviously :-) )

That's about it, I didn't take many photos from my trip but I'm pretty fond of the ones I got. I'll be happy when I finally have my camera charger from home. Oh, that's right, I'm flying back to California on Thursday afternoon! I'm pretty psyched to see my parents and friends, and to engage in a little food-ourism (gastro-tourism? that sounds gross). This means: in'n'out, cupcakes, frozen yogurt, mayfield, bistro elan, sushi, brown rice sushi, pancakes, scones, and cookies! Also: swimming, the dish, interval training, going to the movies, walking to California ave, dance classes and blissfully nothing at all. Too bad I'm not actually on vacation, I'll still have lots of work to do!

Well I guess it worked, I've finished telling you all about Paris and I'm no longer in the mood (exactly) to whine. I'm sure if I can even adequately explain in this platform, so maybe I'll just continue to pretend that I'm blissfully happy. Bliss! Bliss! Flower petals are falling from the sky at all times.

Monday, May 10, 2010

Asparagus, Pancetta, Shallots and Feta Pasta

Yesterday I made the most delicious pasta in the history of my pasta making. Seriously, Laura (S.) remember that bacon tomato pasta sauce? Yeah, this is better.

Let's jump right in, shall we? This is easy enough that anyone who likes pasta and has a half an hour should try it out. You can use this pasta cooking technique for almost any combination of vegetable and cheese that you like, and if you're a vegetarian you can, of course, forgo the pancetta.

Ingredients: Olive oil, salt, pepper, pancetta, chicken broth, pasta, asparagus, shallots, feta cheese

Get out a medium pot, or any kind of pan with high-ish sides. Whatever vegetable you want to add should be cooked and cut into pieces roughly similar to the size of the pasta you have chosen. This dish works best with pasta like penne, rigatoni, farfalle or rotini. You're going to start by crisping up your chopped pancetta in the bottom of the pan (the pieces should be not too big, not too small). Keep the stove between medium and high, you shouldn't need to adjust the heat at all throughout the recipe. Once the pancetta is crisped and browned take it out of the pan and set it aside (you'll be using it soon enough). Make sure you don't pour it out, because you want that yummy fat in the pan to brown your shallots.

The shallots should be sliced thin before you toss them in the pan. Stir and flip them around so they get nicely covered in the fat, and if you've added it, the olive oil. You don't want them to get too brown to fast, so if they start to get to hot pull the pan of the burner and shake them around a bit. To get it right you can pull it off the burner and put it back as much as you'd like. After a couple of minutes they should have softened and will start to look cooked. At this point you should put the pasta in the pan with the shallots, stirring and tossing for a minute until they are slightly toasted and covered in oil/fat. Yum.

Add chicken broth to the pan until the pasta is just covered. This should be enough that after the broth has been absorbed, the pasta will be cooked through (but not overdone). Make sure you stir it frequently so the pasta cooks evenly.

While the pasta is cooking, and in between stirring, you chop up the feta cheese. When the pasta is almost done, add the asparagus and mix it in. When the liquid is almost completely gone and the pasta is cooked, pour it into the dish in which you'll be serving, topping it with the feta and pancetta from earlier. Don't salt it too much, the cheese and pancetta should give it plenty of flavor already.

Then you're ready to eat! Doesn't cooking it this way make up a nice sauce for the pasta? Really rich and tasty. Next time I might add some lemon juice to the chicken broth, and top it with zest afterward. I think the original recipe called for that but I was too lazy to zest a lemon last night.

Tuesday, May 4, 2010

Italy

Italy, Italy, Italy. This is where I spent the summer of my 19th year learning Italian. I always remember it as being a vaguely uncomfortable trip. The heat and humidity meant that my skin was horrible and I was constantly getting sick, I never had enough sleep and I must have gained 15 pounds in a matter of weeks. It was glorious! I love going back, so when my father took me with him a couple weeks ago I was a pretty happy camper. Work and travel? What could be better!?

Well. As it turns out wearing a suit and heels in the train is uncomfortable, especially when you have heavy bags to carry. And of course I left my jeans in Switzerland, and had to go shopping (I hate doing this in Italy, it's impossible!). It was uncomfortable, and yet I relished the feeling because it was so very Italian to me. Vaguely uncomfortable and completely wonderful. So what did we do?? I've already told you about the food, so let's talk about the touring!

My father has been staying in the same hotel in Florence for thirty years. It's called the Hotel Villani, run by one Erminio Villani, and it's a single floor in a building about a block from the Dome. In fact, the Cathedrale (di Santa Maria in Fiore) is so close that you can't take a picture of it out the window. It's just too big! Here is an example of my attempt:


 Pretty pathetic, no? Here is a better picture, taken down the block the night before:


I think it might be one of the nicest pictures I've ever taken.

While wandering around the city this time I stumbled across a little museum I didn't even know existed, the artifacts of which left me breathless for an entire day! Can you guess what it might have been? Probably not. It was the Salvatore Ferragamo shoe museum! As it turns out, you can order recreations of famous shoes worn by movie stars! Rita Hayworth, Greta Garbo, Audrey Hepburn and Sophia Loren, among many others, wore his beautiful shoes in their movies. Even Marilyn Monroe! They are so beautiful in person that words cannot describe. And since photos are verboten in the museum I can't show you either. Just be sure you get yourself over to the website and have a look. It really has to be seen to be believed. (http://www.museoferragamo.it/en/scopri-cinema.php)

We took a trip outside of Florence one day to see Tuscany a bit. We went to San Geminiano, a little walled medieval city that has been beautifully restored and is now a world heritage site. Here is a photo:


We also saw Siena, which is worth a look although not as beautiful to me as many other Italian cities, and to a little town I had never heard of before called Monte Reggiano, where we ate incredibly tasty proscuitto on traditional tuscan bread (unsalted) and very fresh pecorino. Yum! Here is my father and our friends enjoying our wine in the rain. At the end of the day we headed to a farm that produces its own wine and olive oil, and which has a lovely restaurant. A truly Italian dinner followed, by which I mean pasta, meat, contorno of beans and a little dessert, all with plenty of wine!


The volcanic ash lengthened our stay in Tuscany by a couple of days, although we ended up getting quite a bit of work done while we were there. We had a ton of wonderful Tuscan food and got to spend more time wandering the city than we anticipated. But now I'm running out of more things to say about the trip, so I will leave you with some more photos (including a couple of the Ferrari museum in Modena). Enjoy!


Oh my beloved Dino. I want a car just like you!


Let's see where this goes

I'm not highly motivated to write at the moment, the weather over Lugano is absolutely dreadful and I'm in a bit of a food coma. Side note? Melt dark chocolate with a bit of butter and cognac. Seriously, it turned my mood around. Before I forget I also need to share a truly weird story. The past few days there have been more bugs than usual. Specifically I keep finding these giant brown spiders on my bedroom floor (and only in the bedroom). Now anyone who knows me knows I hate, loathe, despise and otherwise abhor spiders and bugs of all kinds. Even typing the words "spider" and "bug" give me the creepy crawlies. One of these spiders was even big enough that I could see it without my glasses on. Just to be clear, I can't see my own hand in front of my face without my glasses. Yikes. So when I saw the first giant critter I thought, "I don't have the energy to deal with this right now, I'm just going to trap it under a glass until I get the courage up to kill it". So I did. Except I never did get the courage to kill it, and more spiders kept showing up... long story short I basically have a little menagerie in the corner of my bedroom of spiders trapped under glasses. I'm started to feel like a creepy serial bug killer a la Silence of the Lambs, letting the bugs build up their terror before I kill them. But I'm not really like that! I just don't have the courage to kill them. This is why people have boyfriends and roommates, huh?

But on to nicer things. See I haven't told you about when my friend Jon was here and we went to Bellinzona for the flower festival. Up until this moment I wasn't sure if I was going to, because I'm feeling lazy, but here we go! Bellinzona has a market on the weekends, but one weekend a year they also have a flower festival where local florists submit impressive structures made of flowers (and wire, etc). The general public gets to vote! Here are some examples of the entries, which are located in little corners all over the city center:


Actually, I don't think the giant chair was entered in the competition, but still. It's pretty, right? There were also giant vegetable constructions suspended over the streets. At least I'm pretty sure one of them was supposed to be a carrot.

Throughout the rest of the year Bellinzona is known for the awesome castle whose wall cuts through the middle of the city. It's pretty confusing, we were attempting to access the castle by climbing up ancient stairs to locked gates, when in fact the part that was open for tourists was on the opposite side of town. Once we finally made it was started laughing at the entrance. The "door" is a concrete tunnel with a very high ceiling cut into a sheer wall of rock. You walk in a few yards and there is an elevator and a staircase going maybe four floors up to the castle grounds. It looked a little like something out of Lord of the Rings, I swear. Let's see if there's a good picture. This doesn't show the entrance itself, but it's cut into the wall of rock pictured here. Once you get into the castle walls you can walk up the tower to see the valley. It's really very pretty.


So Bellinzona was an utter success, but we were also able to visit Lugano and nearby Ponte Tresa, sort of the Tijuana of Italy and Switzerland. Only with pasta and cheese instead of drugs and booze. All in all it was a delightful weekend (with beautiful weather). Unfortunately I came down with a cold directly afterward, which I have only just kicked.

Here are a couple more pictures from the trip.


A traditional Swiss Alpine band!


A View!